|

2222 Morris
Avenue, 2nd FL, Union, NJ 07083
http://www.DigiDMS.com
support@DigiDMS.com
Phone: 908.688.8810, Fax:
877.733.4305
Patient Portal
Document Type: Help Manual
Version: 1.0
Preface
About this Document
This User Manual provides a complete and easy-to-follow
guide to users of Patient Portal. Users can navigate by the Table of Contents of
a title or click on any item in the Table in order to understand functionalities
Patient Portal.
Document Owner: DigiDMS,
Inc.
Target
Audience
This guide is
intended for Users of DigiDMS, Inc.
Assumptions
Not Available
Contact
Information
DigiDMS, Inc.
2222 Morris Ave, 2nd Floor Union, NJ-07083 Ph: (877)-1.866DGDMS,
(908)-688-8810 Fax: (877) - 733 - 4305
Copyright
and Disclaimer
Confidentiality
This document and the
information contained herein are confidential to and the property of DigiDMS,
Inc. and are made available to DigiDMS users and others acting on behalf of the
company for the sole purpose of understanding, conducting development or
business for DigiDMS, Inc.
The contents of this documents
(either in part or whole) must not be reproduced, stored in a retrieval system,
transmitted or duplicated in any form or by any means, including photocopying,
electronic, mechanical, recording or otherwise, without the prior written
permission of the copyright holder: DigiDMS, Inc. DigiDMS may make changes or
improvements in the software or specifications described in this document at
any time without notice. These changes will be incorporated in new release of
this document.
Disclaimer
Every effort has been made to
ensure the accuracy and correctness of the information contained herein.
However, in the unlikely event of certain errors and/or omission, DigiDMS, Inc.
will not be liable to be held responsible for any loss whatsoever due to the
usage of this document. DigiDMS, Inc. also reserves the right to modify the
contents of this document without any prior notice.
Document
History
|
Version
|
Date
|
Person
|
Change Type
|
Change Remarks
|
|
|
|
|
|
|
Related
Documents
Contents
Introduction. 6
Changing default password of
patient’s account. 9
Log in to Patient Portal 11
Introduction to the Portal Interface. 13
To view a list of your active
problems documented by clinic: 16
To update Problem list: 16
To view a list of your active
Medications documented by clinic: 17
To update Medication: 17
To view a list of Allergies
documented by clinic: 18
To update Allergy: 18
Communicating through the Portal 19
Sending Messages to Clinic Staff. 19
Requesting an Appointment. 21
Cancelling, or Rescheduling an
Appointment. 23
Importing, Exporting, or Printing
Health Summary. 24
Requesting a Medication Refill 28
Managing Clinics. 32
Sharing Chart. 36
To view chart shared by other
patients. 36
To share chart. 38
If patient forget password. 39
To Reset your password. 39
“My Personal chart” is Patient Portal i.e. a web-based
system that serves as a secure communication link between you and the clinic.
When you log in to the Portal with your private user name and password, you can
see information that is pulled from DigiDMS EHR at the clinic and displayed on
the web page.
“My Personal chart” taps into the power and convenience of the Internet
to help you update patient information; coordinate patient appointments; manage
chronic conditions; and send/receive information.
Using My personal chart patients are able to synch their
inpatient record with their personal health record and better manage their own
health information The secure, patient Web-portal lets patients log in to
access and update their health information, view their scheduled appointments,
update registration information, see billing statements, access medications,
immunization records, wellness schedules and read physician-annotated lab
results.
1.
Once patient clicks on the Patient Portal link provided in Email he will
be redirected to https://www.mypersonalchart.com/ and will be served with “Terms and Condition”
webpage as shown in image below.
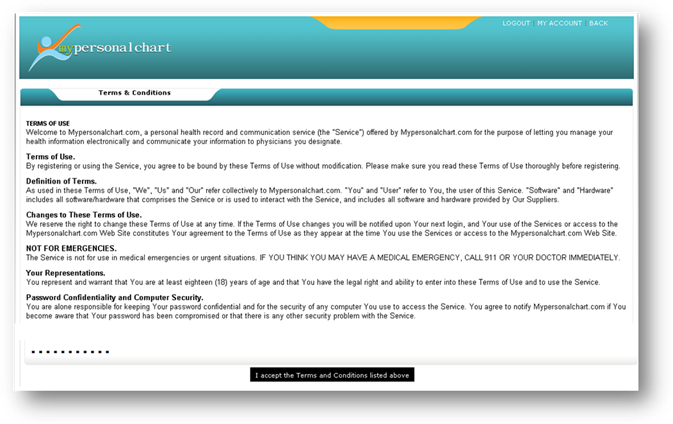
2.
Scroll to bottom of page and click on button “I accepts terms and
conditions listed above”
3.
Once terms and conditions have been accepted user will be taken to “Change
Password” page as shown in image below
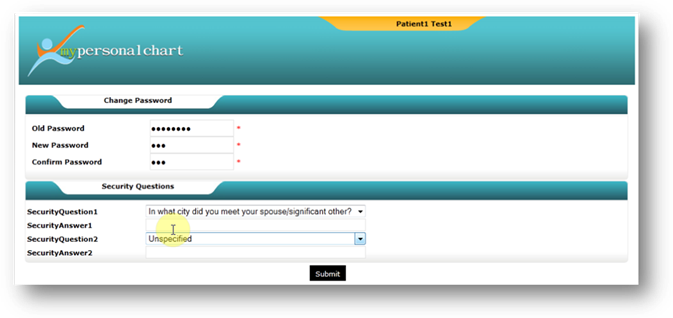
4. Type the required password in “New Password” and “Confirm
Password” fields
5. Provide security questions which will be later utilized for
resetting user password
Finally click Submit button
to change password. Patient must use this password to log in to the Portal.
To access the patient’s account in Patient Portal:
1. Open a web
browser.
2. Type the
URL: https://www.mypersonalchart.com/ in the
address field of the browser.
3. Press the
Enter key.
4. The
Portal home should be displayed in your browser. As shown in image below
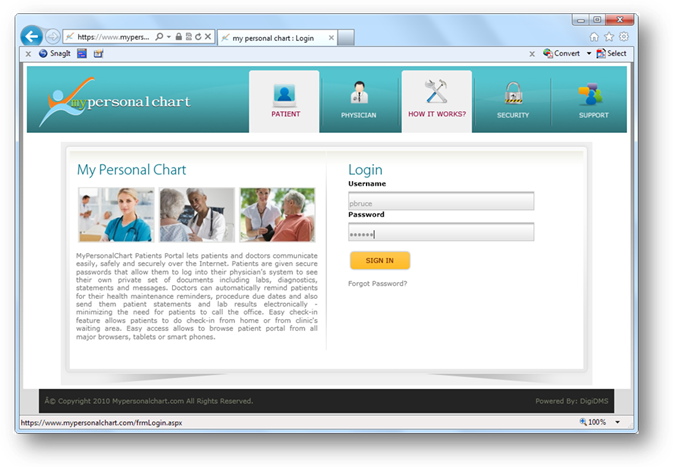
5. Enter user name and password in the fields provided.
6.
Click the Sign In button.
After
logging in to Portal, patient can:
·
Use the messaging feature to communicate with clinic staff.
·
View his health summary information.
·
Send health summary information update requests if he notice
missing information.
·
View results of lab and other diagnostic tests.
·
Schedule, confirm, cancel, or reschedule an appointment.
·
Add an appointment request
·
Request a referral or a medication refill.
·
Print or save an electronic copy of your Health Summary using the
standard Continuity of Care Record (CCD) format.
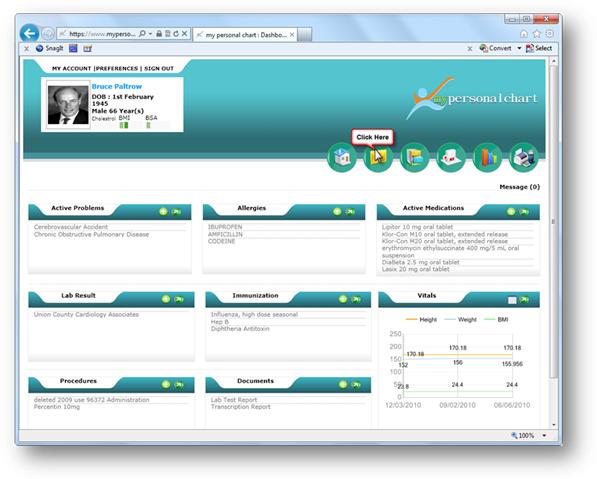
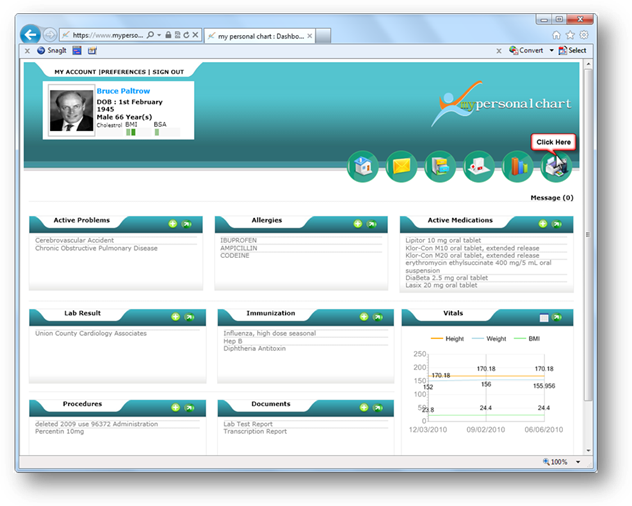
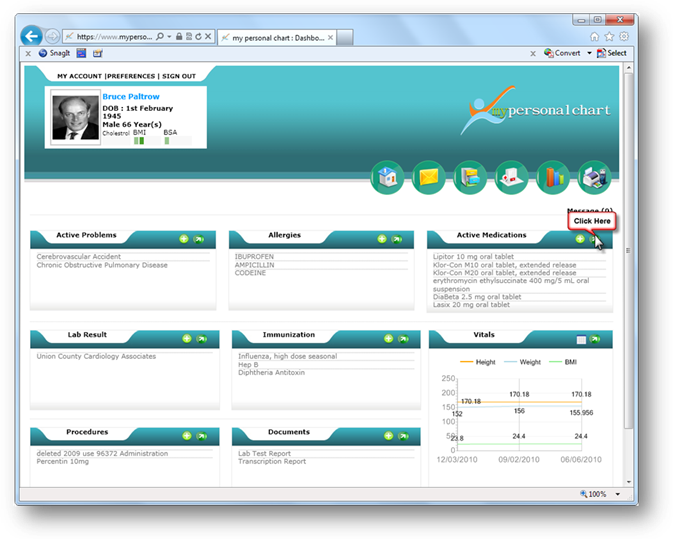
Once patient login to his portal account he will be redirected
to his dashboard page as shown in the image below
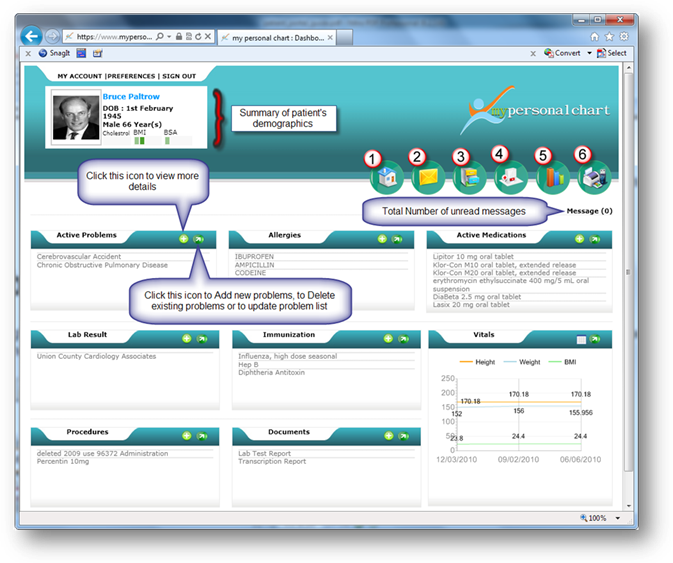

Dashboard:
A typical user's configurable dashboard with separate sections for active problems, Allergies, active medications, lab results, Immunizations, procedure, documents and vital signs containing vital charts showing personal vital signs tracked so far.

Messages:
The quick link for
messaging module, using this module patient can view all communications from
the clinic through patient’s portal Inbox under the messages tab. Attachments
may be included with communications sent by the clinic.

Demographics:
Demographic
section consist of items such as patient personal, Contact, Payment, Insurance
and ledger details, Guarantors, and emergency contact information.

Manage Clinics:
From this module
patients can maintain list of clinics they generally visits. This module
also allows patients to register themselves as new patient into DigiDMS EHR used
in patient’s clinic and provide demographic data. With each clinic there’s
clinic specific patient registration form attached that can be use by patient
for online registration. Patient can also add new clinics to their existing
list of clinics.

Share Chart:
Using this module
patient can choose to share their information with providers so that healthcare
organizations have a more complete pictures of a patient’s condition and
overall health, Patient can sync their personal health record providing updates
to physicians and nurses so they can be proactively involved in helping
patients manage chronic conditions. Chart can be share with other users as
well. When a patient approves the sharing of certain information, physicians
can send online health record information to unaffiliated clinicians, promoting
a more collaborative approach to treating a patient.

Import-Export:
Patient can import
or export health data in CCD format, data exported in CCD format provide a
snapshot in time containing the pertinent clinical, demographic, and
administrative data for a specific patient. Data exported can be sent
electronically from one caregiver to another. It contains various sections such
as patient demographics, insurance information, diagnoses and problem list,
medications, allergies and care plan.
The Portal allows patient to view and update general health information
documented in DigiDMS EHR at the clinic. General health information that patient
can view and update includes:
·
A list of active health problems
·
documented allergies
·
A list of active medications
·
Procedure performed
Patient is not allowed to update following information
·
Lab results
·
Patients immunizations
·
Vital signs
·
Health Documents
New information submitted through the Portal is routed to a member of
clinic staff in CCD format and not directly into DigiDMS EHR patient’s
records. Clinic staff will review the new information and determine whether it
is appropriate to add the information to patient’s records. The new
information will not be visible in the Portal until the clinic staff updates patients’
records.
From patient dashboard “Active Problem” section, click on icon  to
view details of active problem as documented in DigiDMS EHR at the clinic. to
view details of active problem as documented in DigiDMS EHR at the clinic.
1. Click on  icon
from active problem section to open list of current problems as shown in image
below: icon
from active problem section to open list of current problems as shown in image
below:
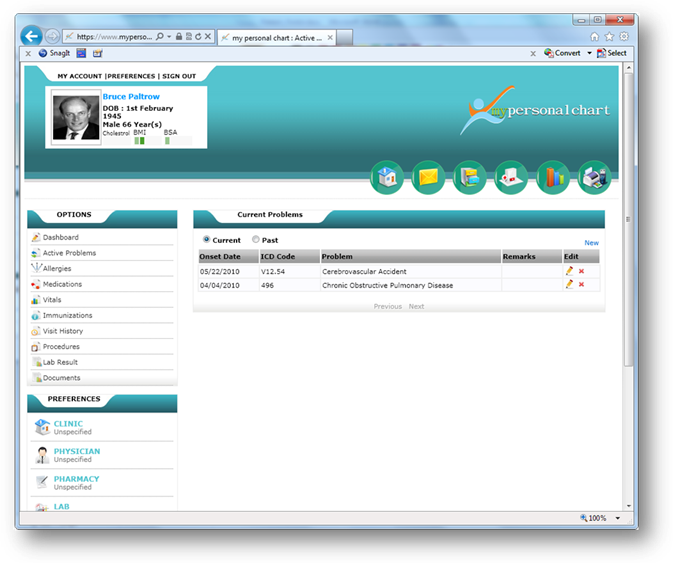
2. From the
webpage provided to edit or to add new problem list click on  to edit
existing problem list to edit
existing problem list
3. Click
on  to delete the problem from
the list of problems displayed to delete the problem from
the list of problems displayed
4. Click
on “New” link to add new problem to list
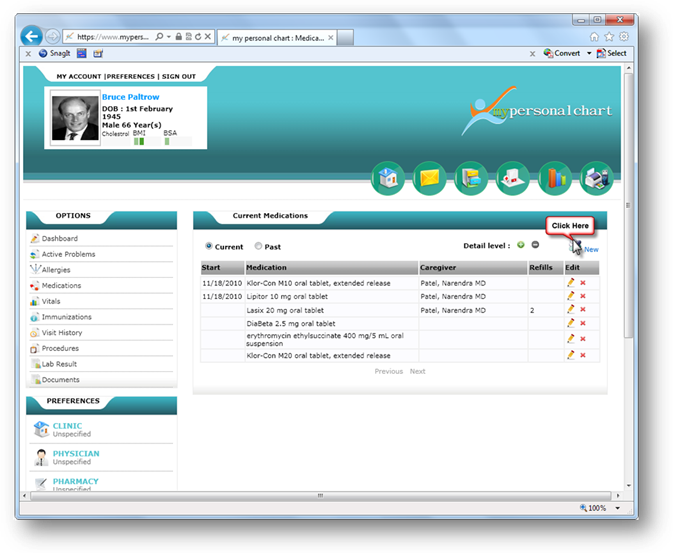
From patient dashboard “Medication” section, click on icon to
view details of active medication as documented in DigiDMS EHR at the clinic.
1. Click on icon
from active medication section to open list of current medication as shown in
image below:
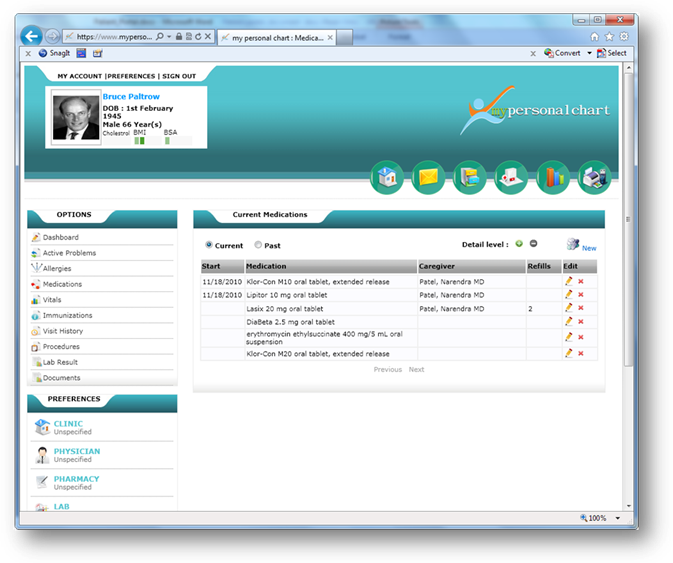
2. From the
webpage provided to edit or to add new medication click on to edit
existing medication list
3. Click
on to delete the medication
from the list of medications displayed
4. Click
on “New” link to add new medication to list
From patient dashboard “Allergy” section, click on icon to view
details of Allergy as documented in DigiDMS EHR at the clinic.
1. Click on icon from Allergies
section to open list of current medication as shown in image below:
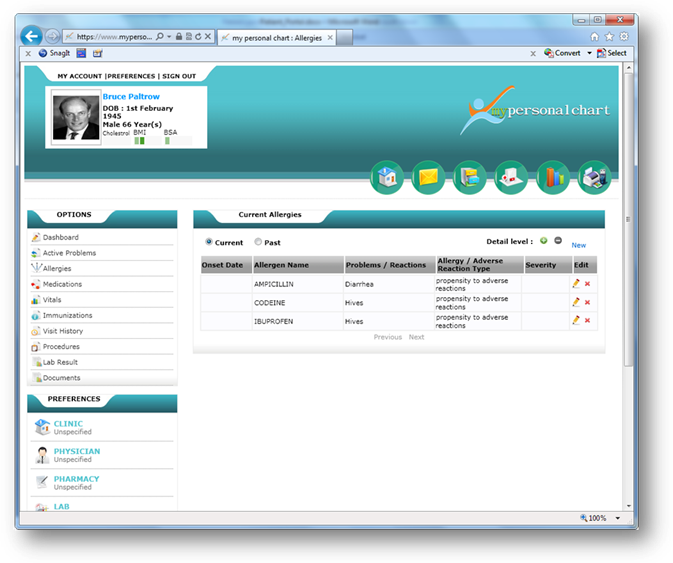
2. From the
webpage provided to edit or to add new allergy click on to edit existing allergy
list
3. Click
on to delete the allergy from
the list of allergy displayed
4. Click
on “New” link to add new allergy to list
The Patient Portal provides a convenient communication link between
patient and their clinic. For example, patient might use Portal to send a
message to a particular staff member, request a referral, request a medication
refill, or schedule an appointment. Messages that clinic might send through the
Portal include lab and test results, responses to requests you submitted
through the Portal, messages requesting information, or general announcements
sent to all Portal patients.
Patient can view all communications from the clinic through their
Portal account Inbox in the Messages modules. Attachments may be included with
communications sent by the clinic.
Patient can use the Portal to send a new message to or respond to a
message sent by your clinic.
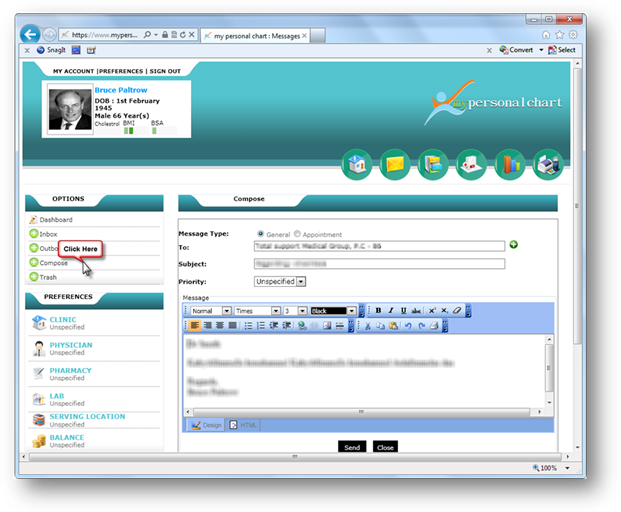
To send a new message to a clinic staff member:
1. On
the main portal user dashboard click on quick link “Messages” as shown
in image below
2.
Once patient click on quick link “Messages” he will be redirected to
message inbox module displaying list of all the messages received so far as
shown in image below.
3.
To compose new message, from the “OPTIONS” section of the left
side bar click on “Compose”
4.
Select message type “General “
5.
In the “To” field of the New Message window, Type user name which will
get auto complete if user exist or click the + button and then select
the name of the person to whom you want to send the message as shown in image
below.
6.
In the Subject field, type a few words to describe what the message is
about.
7.
Type the message in the space below the Subject field and click Send button.
 . .
Patient can request appointment scheduling through the Portal directly
into DigiDMS EHR appointment scheduling system.. The following instructions
for requesting an appointment apply to clinics using DigiDMS EHR.
To request an appointment:
1.
To schedule an appointment, click on “Compose” from left side bar.
2.
Select message type “Appointment”, it will display list of all the
“Active” and “In-Progress” appointments
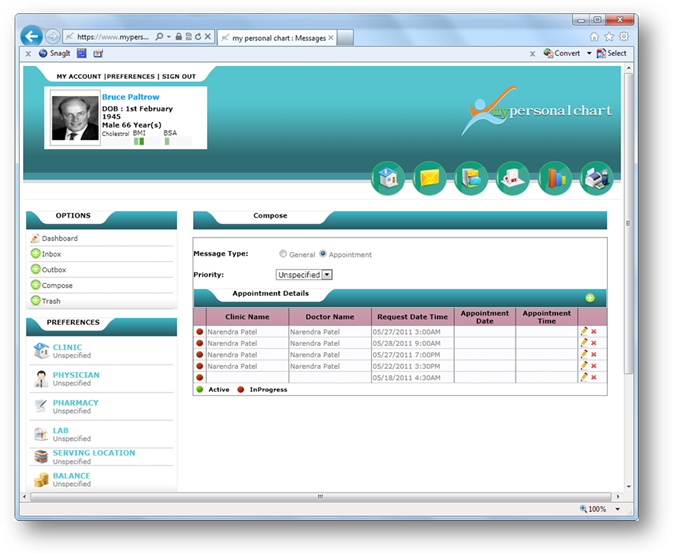
3.
From “Appointment detail” window click on to
request new appointment.
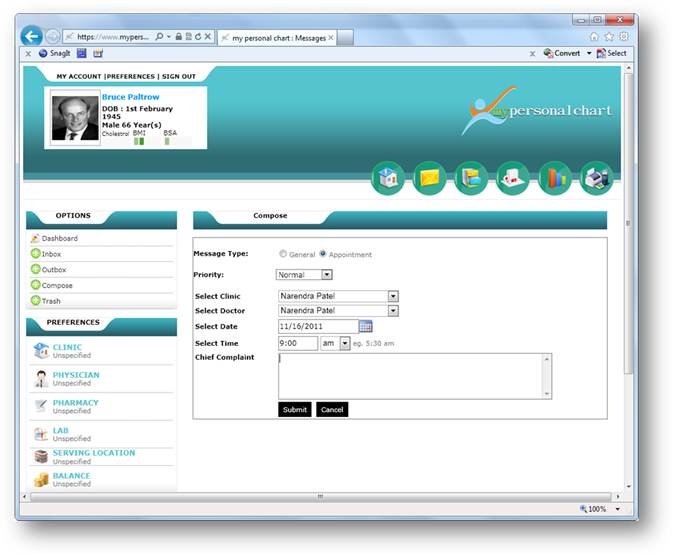
4.
Mention the priority of appointment request
5.
Select clinic by clicking the down arrow, and then selecting a clinic from the
drop-down list
6.
Select doctor by clicking the down arrow, and then selecting a doctor from the
drop-down list
7.
Click on calendar icon to display a calendar. Click a date in the
calendar to select the date.
8.
Type time in hh:mm format and click the down-arrow to select “am” or
“pm”.
9.
Add additional information regarding Chief Complaint that will be
helpful for the practice to know. you might also describe the symptoms you are
experiencing.
10.
After you have completed all required fields for the appointment
request, click Submit. Patient request is sent to the clinic’s
scheduling Waiting List, and the appointment appears in patient’s list of
appointment requests waiting for clinic processing. Patient will also receive
an e-mail message confirming receipt of appointment request. After the clinic
processes the request, it will move to the confirmed appointments list with an
appointment date and time.
To cancel an appointment:
From the list of appointments displayed click on  to cancel an appointment, If
you click Cancel Appointment, the clinic is notified of the cancellation, and
the appointment is removed from the list of appointment displayed. to cancel an appointment, If
you click Cancel Appointment, the clinic is notified of the cancellation, and
the appointment is removed from the list of appointment displayed.
To reschedule an appointment:
From the list of appointments displayed, click on  to update appointment
information and to reschedule it. to update appointment
information and to reschedule it.
1.
Patient Portal allows patient to view your Health Summary, which
contains a “snapshot” of the health information currently documented in your
electronic medical record at your doctor’s office. Patient can print a copy of
his Health Summary, or can save (export) a copy to his computer.
Patient may want to take a copy of his Health Summary with him if he go
to see another doctor. This will enable the new doctor to have detailed
information about his health history and to review all medications that he is currently
taking before prescribing new medications. This promotes Continuity of Care
Records (CCR) handling between providers and is especially useful in avoiding
potentially dangerous medication interactions.
To import, export or print health summary:
1.
From patient dashboard of Portal screen, click the Export-Import quick
link To open Print chart module as shown in image below
2.
Once patient click on “Export-Import” quick link, he will be
redirected to “Print Chart” page as shown in image below.
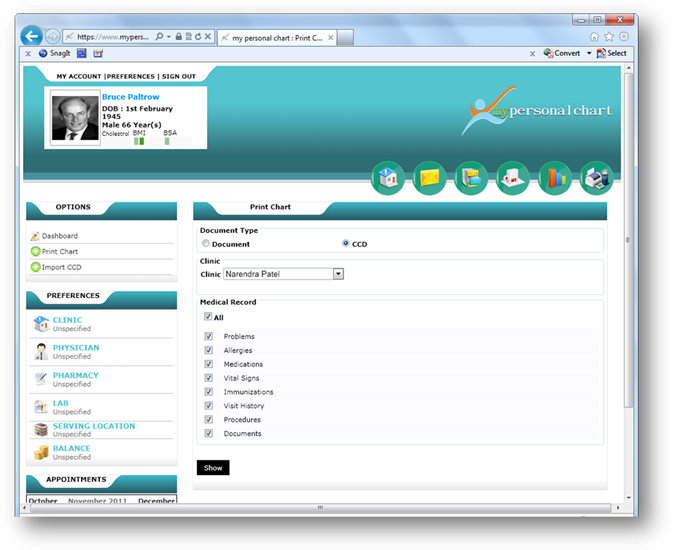
3. To
view Document in CCD format click on option button “CCD”
4. Click
on dropdown list to select clinic name to fetch patients record from
5. From
medical record section click on required medical information to select them.
6. Click
on “Show” button to generate CCD document. User will be redirected to page
asking user to View, Download or Send documents to clinic.
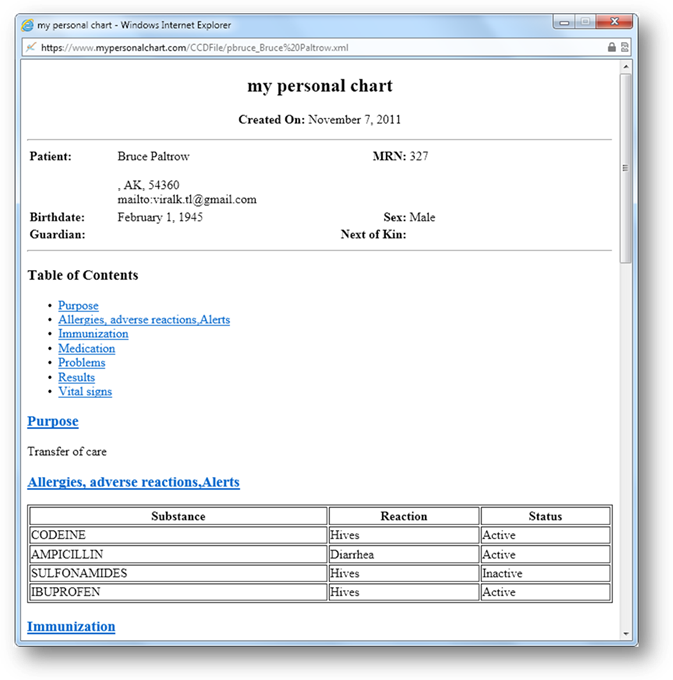
To view CCD Document
Click on “View” button to view CCD document as shown in
image below
To export CCD Document
1.
Click on “Download” button to export CCD file.
2.
Once user click on “Download” button he will be redirected to page
where user require to make a selection between:
a.
Downloading CCD document in .XML format or
b. Downloading CCD in .XSL format.
After saving the Health Summary file to your computer, you can attach
that file to an e-mail message if you need to send it to another physician
electronically. CCD files are recognized standards that some medical practices
may be able to import directly into their electronic medical record if they use
an electronic record system.
To Import CCD Document
1.
From side bar click on quick link “Import CCD” to open “Import CCD”
page.
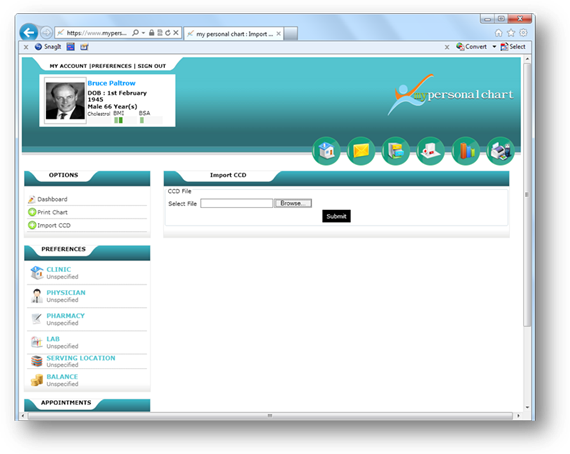
2.
Click on browse button to select CCD file and click on “Submit” button
to import information from CCD document.
Patients use the Patient Portal to request a refill for an existing
prescription. Refill requests sent to the clinic through the Portal must be
reviewed and approved by a clinic provider before they will be refilled.
To request a medication refill:
1.
From the user dash on main portal screen click on “View more”  icon of “Medication”
section as shown in image below icon of “Medication”
section as shown in image below
2. Clicking
on icon will open “Current
Medication” page
3.
To request a medication refill, click on refill medication icon  as shown in image below as shown in image below
4.
Click on refill medication icon will open page displaying list of all
the current medication with check boxes as shown in image below.
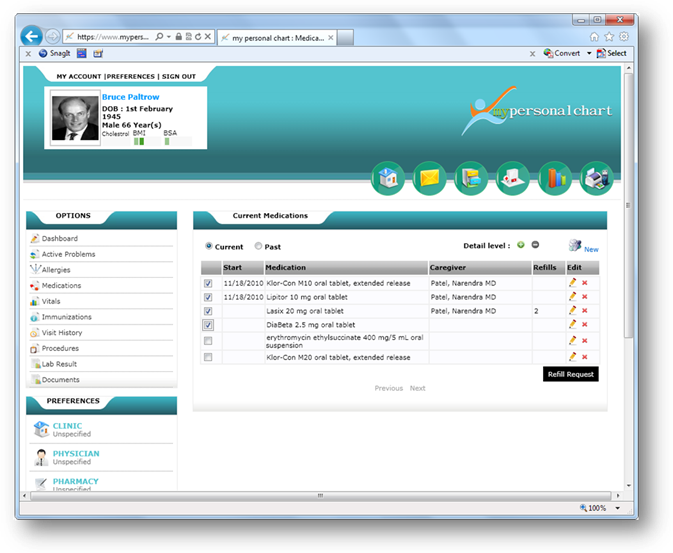
5.
Click the check box to the left of each medication to be refilled, and
then click “Refill Request” button (located at bottom of page).
6.
Once user click submit button “Medication Refill Request” window will
appear as shown in image below.
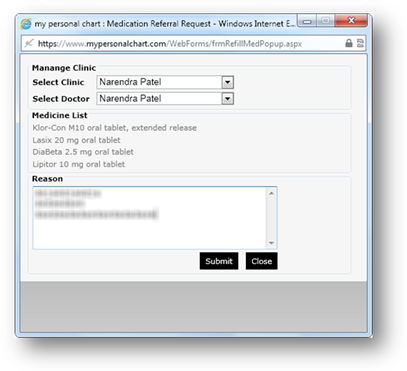
7.
When user click Request Refill button, all medications he
selected for refill appear in a Medication Refill Requests window and a
reason field is provided for providing reasons for which request for refill is
made also user can include additional information, such as name and address of
the pharmacy where user would like the prescription to be filled. Although the
clinic may have the original pharmacy information, it is a good idea to confirm
all information here, especially address and phone number to identify the
specific branch of the pharmacy.
8.
Finally click on “Submit” button to send refill request.
Patient can manage list of clinics they generally visits.
To manage clinics
1.
From patient dashboard of Portal screen, click the “Manage Clinics”
quick link to open manage clinic page as shown in image below.

2.
“Manage Clinic” page will display list of all the clinics patient is
already registered with.
To add new clinic
1.
Click on “Add Clinic” button to add new clinic, clicking on “Add new
clinic” button will redirect user to page displaying list of all the clinics
maintaining patient’s record using DigiDMS EHR, as shown in image below.
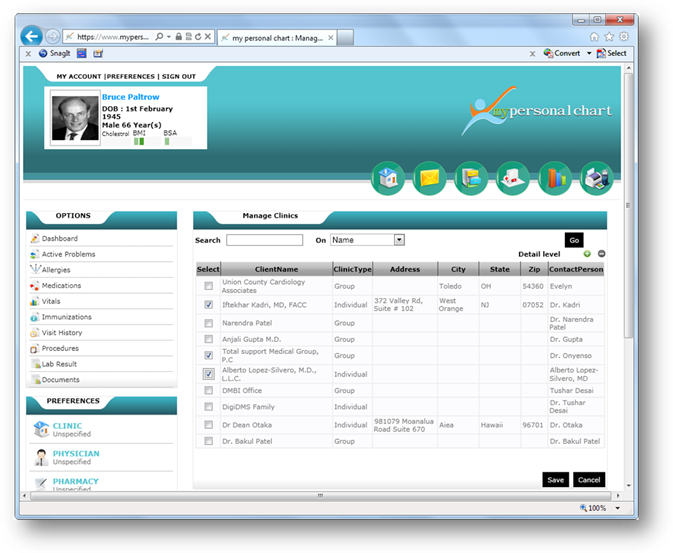
2.
Click the check box to the left of each clinic name need to be added
into patient’s list of clinics.
3. Click
on save to add selected clinics.
To fill patients registration form for selected clinic
1.
Once the clinic added to list of existing clinics to fill registration
form click on icon registration icon . .
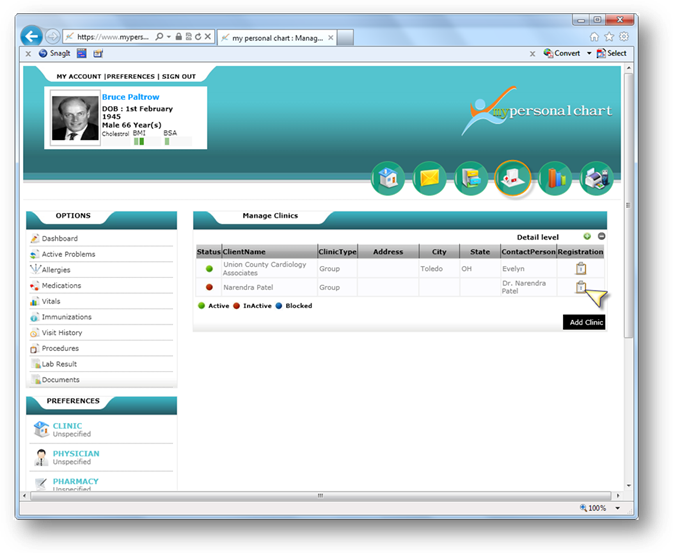
2.
Click on registration icon will open “Patient Registration” form for the
selected clinic. As shown in image below
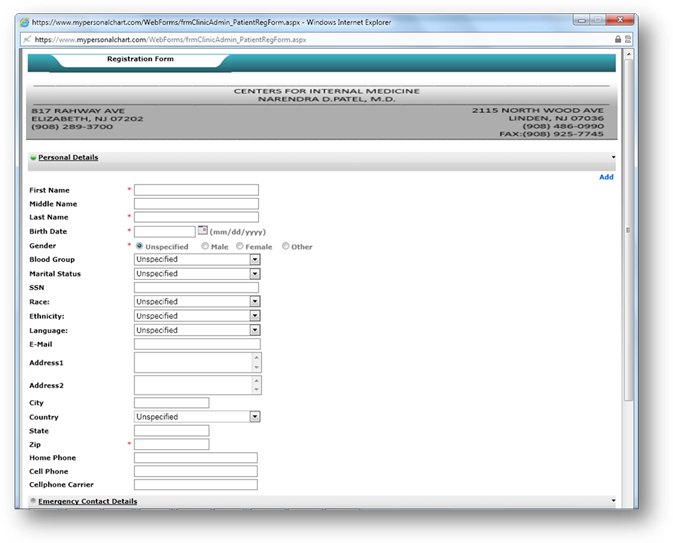
3.
Once all the information updated in registration form click on “Save
Registration” to automatically create the patient
account in DigiDMS EHR and link all related visits to that account, thus
patient no longer come to the office early to fill out paperwork for their
first appointment.
Sharing char module allow patients to share their health
information with other users and physicians
1.
From patient dashboard of Portal screen, click the “Share Chart” quick
link to open view user page.

2.
On view user page list of all the patients sharing their charts will be
displayed as shown in the image below.
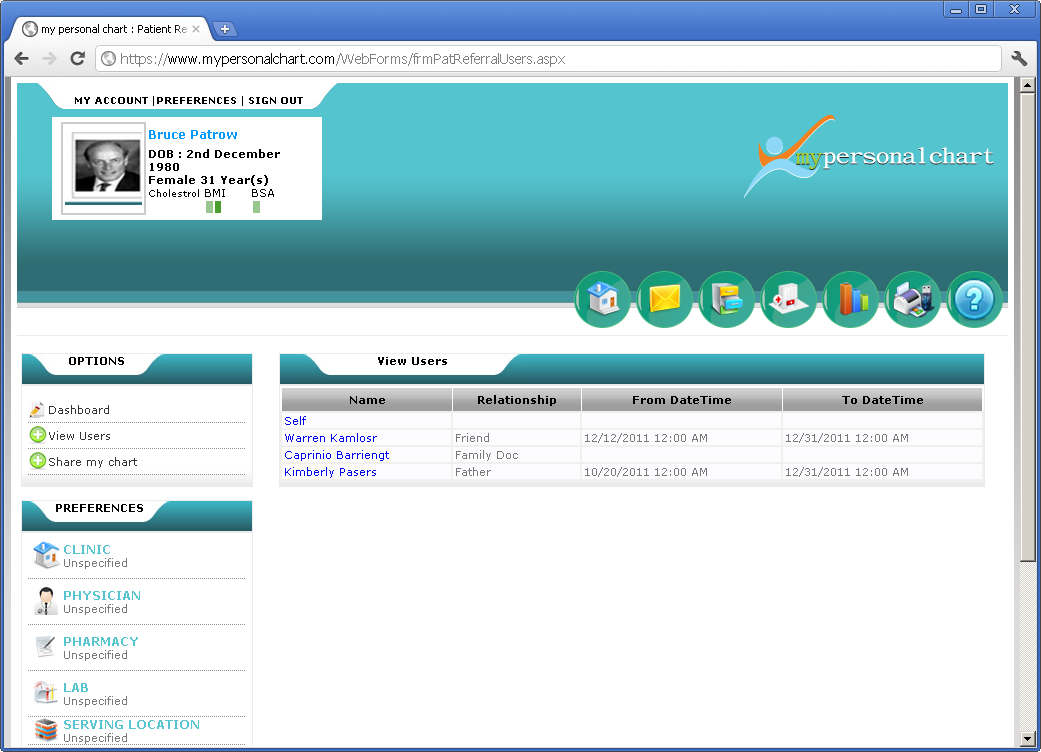
3. Click
on the patient’s name to view their chart.
4. If
user wants to view his chart he require to click on “Self” from view user page
1.
From side bar click on “Share my chart” to open “Share my chart” page as
shown in image below
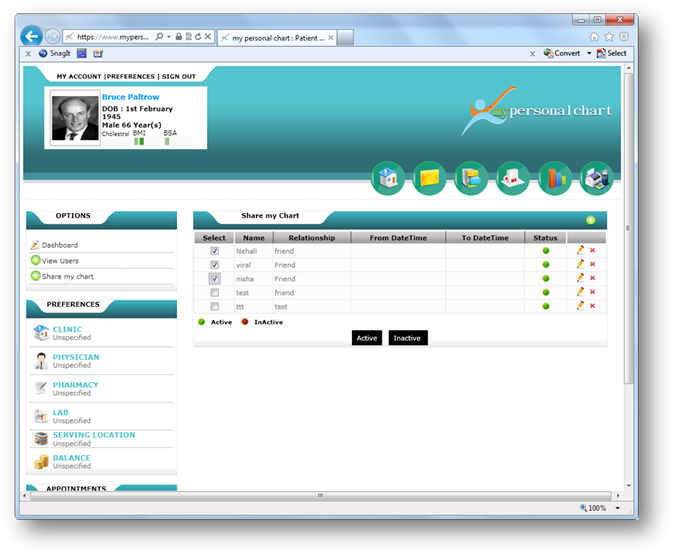
2.
Click the check box to the left of each user with whom user wants to share
his chart.
3.
Finally click on “Active” button to share chart information.
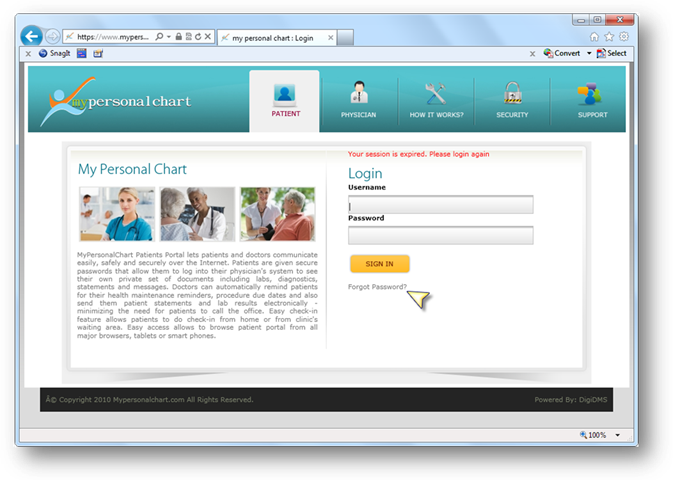
Patient can reset their password from the login area. Notice the text forgot password?
located immediately below the Login button. You can click on this text to
access your security question and reset your password. If you did not set up a security
question and answer, then you can contact the clinic to reset your password. No
one at the clinic knows your password, but they can reset it if necessary, and then
you will be able to create a new password.
1.
In the Login area, click the text forgot password? As shown
in image below
2.
The Forgot password page will be displayed as shown in image below
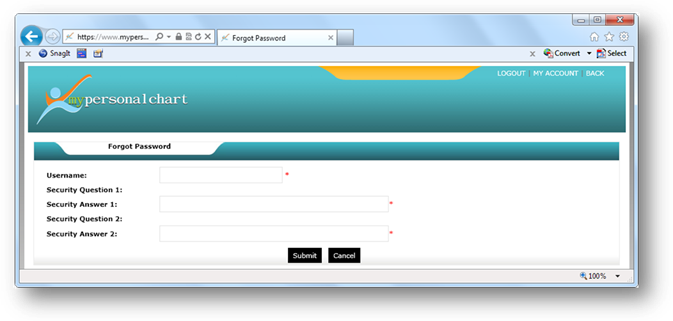
3.
In the Password Retrieval window, type your username
4.
The system displays the Secure Question you entered while creating password
initially
5.
Type the Security Answer you entered in Account Maintenance, and then click
Submit button..
|